Python #Dataprocessing

如何确定实验数据的圆形?

实验数据保存为Tiff文件,其实就是一个强度分布的矩阵,与实际的图片是有区别的。

标签图像文件格式(Tag Image File Format,TIFF)是一种灵活的位图格式,主要用来存储包括照片和艺术图在内的图像,最初由Aldus公司与微软公司一起为PostScript打印开发。TIFF与JPEGPNG一起成为流行的高位彩色图像格式。TIFF格式在业界得到了广泛的支持,如Adobe公司的Photoshop、The GIMP Team的GIMP、Ulead PhotoImpact和Paint Shop Pro等图像处理应用、QuarkXPressAdobe InDesign这样的桌面印刷和页面排版应用,扫描、传真、文字处理、光学字符识别和其它一些应用等都支持这种格式。从Aldus获得了PageMaker印刷应用程序的Adobe公司控制着TIFF规范。

我们需要一个检测圆的算法来实现,我主要参考了这两个教程
Detecting Circles in Images using OpenCV and Hough Circles
Circle Detection using OpenCV | Python

但是我需要再做更改的是:

  • 上面给的例子都是导入一个颜色图,具有RGB三个通道的数据,我们用cv2库可以轻松实现不同颜色通道的表示方法。

  • 实验数据是tiff文件,其实是单通道的数据,我们需要先读取数据

1
np.array(plt.imread(Path+Filename))

再将数据保存为uint8格式

1
img = img.astype(np.uint8)

再保存为灰度图像数据

1
gray = np.array(Image.fromarray(img))

再进行锐化处理

1
gray_blurred = cv2.blur(gray, (3, 3))

最后运用函数cv2.HoughCircles来检测

1
2
3
detected_circles = cv2.HoughCircles(gray_blurred,
cv2.HOUGH_GRADIENT, dp=20, minDist=400, param1=50,
param2=30, minRadius=60, maxRadius=90)

可以定义一个函数完成这些操作。

1
2
3
4
5
6
7
8
9
10
11
12
13
14
15
16
17
18
19
20
21
22
23
24
25
26
27
28
29
30
31
32
33
34
35
def find_center(image_ori, num_approxi):
num_size_ori = np.shape(image_ori)[0]
num_size_ori_half = int(num_size_ori/2)

# First approximated range of the picture
num_approxi = 200
img = image_ori[num_size_ori_half-num_approxi:num_size_ori_half +
num_approxi, num_size_ori_half-num_approxi:num_size_ori_half+num_approxi]

img = img.astype(np.uint8)
gray = np.array(Image.fromarray(img))

# Blur using 3 * 3 kernel.
gray_blurred = cv2.blur(gray, (3, 3))
#gray_blurred =gray
# Apply Hough transform on the blurred image.
detected_circles = cv2.HoughCircles(gray_blurred,
cv2.HOUGH_GRADIENT, dp=20, minDist=400, param1=50,
param2=30, minRadius=60, maxRadius=90)
# if detected_circles is not None:

# # Convert the circle parameters a, b and r to integers.
# detected_circles = np.uint16(np.around(detected_circles))

# for pt in detected_circles[0, :]:
# a, b, r = pt[0], pt[1], pt[2]

# # Draw the circumference of the circle.
# cv2.circle(img, (a, b), r, (0, 255, 0), 2)

# # Draw a small circle (of radius 1) to show the center.
# cv2.circle(img, (a, b), 1, (0, 0, 255), 3)
# cv2.imshow("Detected Circle", img)
# cv2.waitKey(0)
return detected_circles

效果图为

image-20201224173107821

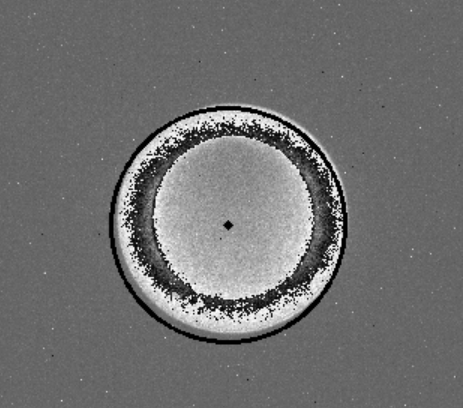
发现效果还是可以的,自己还是得微调才行。